recipe

Apple Cider Donut Bread

Sweet! A favorite fall treat gets a new preparation in this dessert recipe that uses stuff you’ve probably got at home already. 

A new fall tradition: whipping up some apple cider donut loaves!

A new fall tradition: whipping up some apple cider donut loaves!

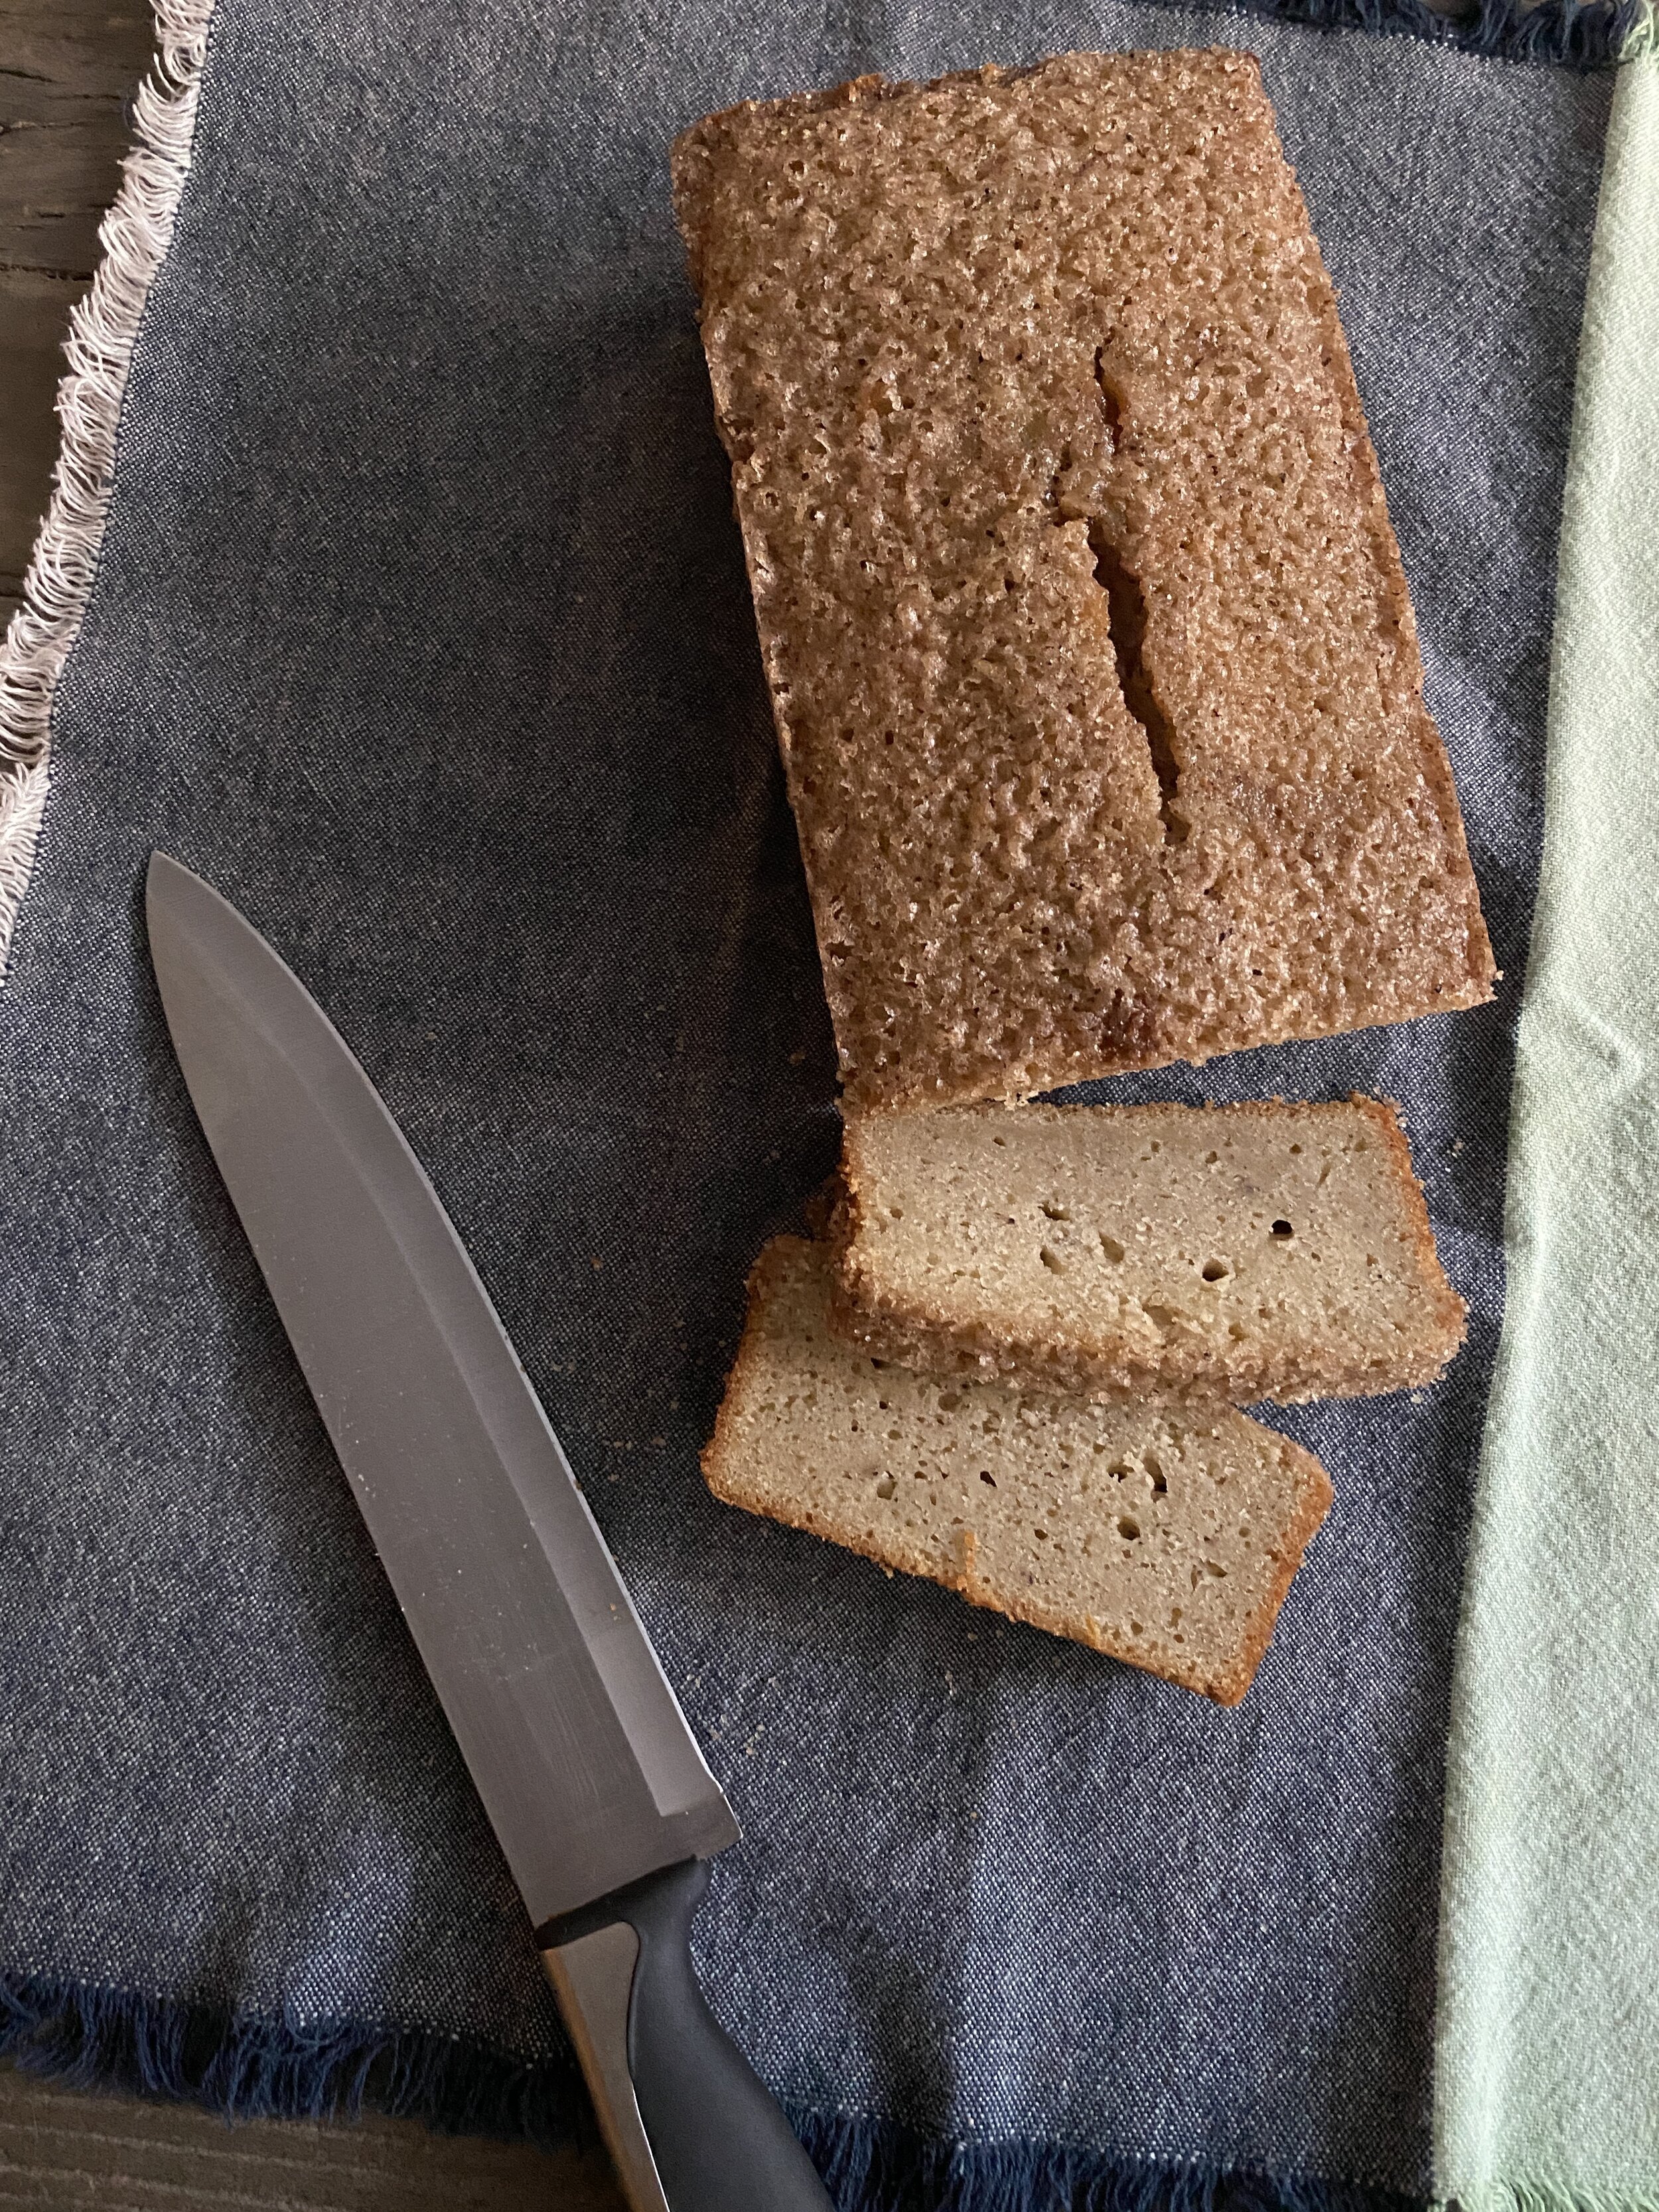
Fall has officially arrived in Chicago. The mild 80-degree days of early October plummeted to the 30s and 40s in the blink of an eye. This delicious baked loaf is the perfect combination of fresh cider cake-style donuts and cinnamon sugar.  

I miss our annual autumnal visit to my family in Ellicottville, New York and going through the legit-scary Pumpkinville cornstalk maze. After making it through, Wally and I would always treat ourselves to some fresh-pressed apple cider and cider donuts. You know the kind that are still warm, a little bit cakey and covered with generous amounts of cinnamon sugar?

Duke and Wally goofing around at Pumpkinville, with their creepy friend Chris in the background

Duke and Wally goofing around at Pumpkinville, with their creepy friend Chris in the background

Our favorite fall tradition: visiting Pumpkinville in Ellicottville, New York, with its a-maize-ing corn maze

Our favorite fall tradition: visiting Pumpkinville in Ellicottville, New York, with its a-maize-ing corn maze

You can imagine how excited I was when I found a recipe on Epicurious for apple cider donut loaf. Three loaves and a bit of experimentation later, I finally figured out the right ratio. This bread has a subtle apple flavor and is totally acceptable to eat for breakfast. You probably have everything you need in your fridge and pantry right now except cider — so what are you waiting for?

Eggs, flour, spices: Check your kitchen — we bet you’ve got most of these ingredients already.

Eggs, flour, spices: Check your kitchen — we bet you’ve got most of these ingredients already.

Ingredients

  • 1 large apple, peeled, cored and chopped 

  • 1½ cups apple cider

  • ½ cup whole milk

  • ¼ cup sour cream

  • 1 teaspoon vanilla extract

  • 2½ cups all-purpose flour 

  • 1½ teaspoons baking powder 

  • ½ teaspoon baking soda

  • 1 teaspoon salt

  • ½ teaspoon ground cinnamon

  • ¼ teaspoon ground nutmeg

  • ¼ teaspoon ground allspice

  • 8 tablespoons (1 stick) unsalted butter, room temperature 

  • ¾ cup brown sugar

  • ½ cup organic granulated cane sugar 

  • 3 large eggs, room temperature 

Anything topped with cinnamon sugar is A-OK in our book.

Anything topped with cinnamon sugar is A-OK in our book.

Cinnamon Sugar 

1 tablespoon ground cinnamon 

⅓ cup granulated sugar

How you like them apples? Some people have said there’s not enough apple taste, so ramp that up if you want.

How you like them apples? Some people have said there’s not enough apple taste, so ramp that up if you want.

Preparation

Adjust oven rack to middle position and preheat to 350°F. 

Grease and flour a loaf pan. Line the bottom with parchment paper. 

For the apples, I used a Honeycrisp, but a Granny Smith would work, too.

Place the chopped apple and cider in a saucepan and bring to a boil. 

Lower heat and simmer for 8 minutes until reduced to 1 cup. 

Remove from heat and let cool, then pulse in a food processor until puréed. The texture will resemble apple sauce. 

In a separate bowl, combine the flour, baking powder, baking soda, salt, nutmeg and allspice. Set aside. 

Using a stand mixer, beat the butter, sugar and brown sugar until light and fluffy, about 3 minutes. 

Add the eggs, one at a time, beating well after each addition. 

Add sour cream and beat until incorporated, about 1 minute. 

Decrease mixer speed to low and add the flour mixture in three batches. After the first portion of the flour mixture is added, pour in the apple mixture. Then add the other two batches of the flour mixture, scraping down the sides and bottom of the bowl with rubber spatula as needed. Increase the speed to medium and beat until just combined, about 30 seconds. 

Add vanilla and beat once more, just to combine, about 10 seconds. 

Pour the batter into the prepared pan. 

Bake for 50 to 55 minutes until the tester inserted into the loaf comes out clean. 

Leave to cool for about 1 hour. 

Generously sprinkle the top of the loaf with cinnamon sugar.

Everyone’s favorite apple cider donuts now come in bread form!

Everyone’s favorite apple cider donuts now come in bread form!

We think this sweet treat works for breakfast or dessert!

We think this sweet treat works for breakfast or dessert!

The end result is a bit subtle on the apple front, but there’s a nice burst of apple flavor when you first take a bite. We’ve added an apple to the original recipe to increase the concentrated flavor; see if that works for you. If you find something you really like, please let us know in the comments section. –Duke

Spicy Old Fashioned Recipe

Ancho Reyes is the secret ingredient that will give this rye classic cocktail the kick you never knew it needed. 

Our old fashioned with a kick is inspired by a trip we took to Mexico City.

Our old fashioned with a kick is inspired by a trip we took to Mexico City.

Here’s a typical scenario over dinner:

Duke and l take a few bites, then: “This is good. But it’d be better if…” I’ll dart into the kitchen and come back with sriracha, hot sauce or red pepper flakes. We sprinkle it on our meal and nod in agreement. “Much better!”

That’s my way of saying that Duke and I have gotten to the point where we prefer pretty much everything to be spicy — and that now extends to our cocktails. 

We first discovered the wonder of Ancho Reyes during our stay at the Ignacia Guest House in Mexico City. Every evening around twilight they’d have a happy hour, featuring a different cocktail and some nibblies. (This is when we first tried crickets, which is a whole other story — though I bet I would’ve liked them more if they were spicy!) 

On a couple of nights, the drinks the hotel served had a delightful kick. When Duke asked what was in them, we heard, “Ancho Reyes,” but had no idea what it was — or that it would soon become one of our favorite boozes. This spicy liqueur is crafted from ancho chilies, which are dried and smoked poblano peppers. 

Here’s how Wine Enthusiast describes Ancho Reyes: “Caramel-y brown in the glass, look for a lightly herbaceous aroma similar to root beer and rounded flavors that mix caramel and cocoa with raisin and cinnamon heat, with a faint smokiness on the finish.” I’m no connoisseur, but that sounds like a lot of pretentious prattle to me. Just know it’s got a bit of a kick and would be great to add to a margarita or, as Duke and I have been whipping up of late, an old fashioned. 

Equal parts rye and Ancho Reyes figure into this old fashioned with a kick — and don’t forget the orange bitters.

Equal parts rye and Ancho Reyes figure into this spicy old fashioned — and don’t forget the orange bitters.

Spicy Old Fashioned Ingredients

  • 1 shot Ancho Reyes

  • 1 shot rye

  • ⅓ shot simple syrup 

  • 4 dashes orange bitters

  • 1 dash aromatic bitters 

Add all of the ingredients to a cocktail shaker, then fill with ice. (I double the recipe to do two at once.) Give it a good shake, shake, shake, and pour over ice — preferably one nice big square cube. 

Garnish with a slice of orange peel. 

If there’s one ingredient you can skip it’s the bitters. I just add a dash cuz I feel bad for it. Really, the orange bitters are all you need. 

Duke likes Bulleit, while I prefer Old Overholt — a highly rated rye at a great price.

If you’re out of rye, bourbon will do. 

Make a couple of these and put on a British murder mystery. You may never want another kind of old fashioned again. –Wally

I Feel Like a Zombie Tiki Drink

Wally’s new favorite drink is a modern twist on a tiki classic, created by Chelsea Napper, bartender extraordinaire.

We just might have found you the perfect summertime cocktail: the I Feel Like a Zombie.

We just might have found you the perfect summertime cocktail: the I Feel Like a Zombie.

There’s just something so appealing about a tiki bar. All those masks and idols that are about as spooky as something out of a Scooby-Doo cartoon. The kooky glasses shaped like skulls or grimacing, bug-eyed faces. Those superstrong, fruity drinks that will knock you on your ass — some of which get set on fire! And, of course, the brightly colored garnishes, including cocktail umbrellas and bananas carved to look like dolphins.

So when you’re stuck at home (perhaps in the midst of a global pandemic) and the sun is shining and all vacations are canceled and you’re yearning for a bit of the tropics, consider whipping up a batch of I Feel Like a Zombies. 

Such was the case when we ordered a delicious tasting menu from Mr. Oiishi, a takeout and delivery concept launched during the coronavirus quarantine, where various chefs create their take on Asian comfort food. 

When we saw cocktail kits dreamed up by Chelsea Napper, bar director at Yugen in Chicago’s oh-so-trendy Randolph Street Corridor, we had to try one out. 

Napper says she came up with the drink by “thinking about the flavors of the classic zombie tiki cocktail but much more modern.”

Which got me thinking: What exactly is the drink version of a zombie, and where did it originate?

Heavy on the rum, with just the right amount of pineapple and grapefruit, chances are you’ll feel like a I Feel Like a Zombie again soon.

Heavy on the rum, with just the right amount of pineapple and grapefruit, chances are you’ll feel like a I Feel Like a Zombie again soon.

The History of the Zombie Cocktail

The first imbibable zombie was created by the appropriately named Donn Beach, the patron saint of tiki bars. He was so worried about someone stealing his recipe that he went to great lengths to keep the ingredients a secret — even from his own bartenders. The recipe, from 1934, consisted only of code numbers that corresponded to otherwise unlabeled bottles on his bar. Although many have tried to hunt down the exact recipe, there’s a good chance it has been lost to the ages (though Beachbum Berry has made it a lifelong quest to uncover the secret formula — and just might have succeeded). 

Beach is said to have referred to the zombie as “a mender of broken dreams” — and one so potent he wouldn’t serve more than two to a customer.

Everything you need to make this twist on the tiki classic, the zombie, including shrub and syrup.

Everything you need to make this twist on the tiki classic, the zombie, including shrub and syrup.

I Feel Like a Zombie Recipe

Ingredients

  • 1 ounce dark rum

  • 1 ounce light rum

  • 1 ounce pineapple cinnamon shrub

  • 1 ounce grapefruit syrup

  • 1 slice dehydrated grapefruit

“I recommend a light and dark rum for this cocktail, but if you’ve only got one or the other, that totally works,” Napper says.

Duke did some research and landed on Diplomático Reserva Exclusiva for dark rum and Plantation 3 Stars for light rum, which we picked up at our friendly neighborhood liquor store, Foremost in Uptown.

What the Heck’s a Shrub?

I had never heard of shrubs before. They’re also known by the unappetizing designation of “vinegar cordial.” The last time I knowingly drank vinegar was during a halfhearted attempt to pass a drug test for a summer job I didn’t want.

Shrubs are nonalcoholic syrups made of concentrated fruit, aromatics, sugar and, yes, vinegar.

Why are they called shrubs? Turns out the name is derived from the Arabic word sharab, meaning “to drink.” Shrubs were all the rage in Colonial America, when they were a tasty way to preserve fruit. Their popularity died out with the introduction of factory foods and home refrigerators but have resurged during the mixology revolution and rise of cocktail bars that like to have at least half of the ingredients in their $15 drinks be of obscure origin. 

Here’s a pineapple shrub recipe to try. And a general guide to making shrubs, stating that they typically follow a 1:1:1 ratio of fruit, sugar and vinegar.

Grapefruit Simple Syrup

As a big fan of sangria and old fashioneds, I’m familiar with simple syrup. This is essentially sugar water, so there’s no denying tiki drinks are on the sweet side — though it’s offset by the high amount of alcohol and the tartness of the vinegar.

Try this recipe for grapefruit syrup

Preparation

Once you’ve got everything you need, add the shrub and syrup to a cocktail shaker. Then add in the rum. 

Fill the shaker 3/4 of the way with ice and give it a good shake for about 10 seconds.

Strain and serve over fresh ice.

Garnish with a cocktail umbrella and dried grapefruit slice if you’re feeling fancy. Bonus points for serving in tiki glasses! –Wally

Milk Bar Compost Cookies

Some people call them garbage cookies or kitchen sink cookies. While you’re baking up a storm at home, throw in whatever sweet and savory snacks that are near the bottom of the bag into this sinfully delicious dessert recipe.

Compost cookies: decadent and the perfect meeting of savory and sweet

Compost cookies: decadent and the perfect meeting of savory and sweet

It seems surreal now, as we move into the third month of our coronavirus quarantine. But back in early February, before the world screeched to a halt, I was in New York on a business trip and walked past one of Milk Bar’s locations, the sister bakery to the Momofuku restaurant group. It was around 9 p.m. and it was still hopping, so I decided not to go in. 

Since we won’t be going to NYC any time soon, I decided to make their famous compost cookies at home. You may wonder why they’re called compost cookies, or, alternately, garbage or kitchen sink cookies. Whatever you want to call them, there’s no denying how addictive and delicious they are. They’re the perfect marriage between satisfying my sweet tooth (with dark chocolate chunks and toffee bits) and Wally’s savory cravings (featuring one of his favorite snacks, potato chips). Although there are a lot of ingredients that go into these, what’s great about them is that you can easily incorporate and use up whatever you have on hand.

Compost cookies are easy and comforting to make — an ideal recipe to add to your rotation, during, say, a global pandemic, especially if you’ve grown tired of making banana bread.

It’s a great recipe for someone like my mom who’s known to throw random ingredients into her recipes. Compost cookies are easy and comforting to make — an ideal recipe to add to your rotation, during, say, a global pandemic, especially if you’ve grown tired of making banana bread.

Luckily for us, Christina Tosi, the award-winning chef, creative force and owner of Milk Bar, has graciously shared her recipes for their baked goods on their website. It seemed downright serendipitous when Tosi showed up as a guest judge on Nailed It! on Netflix as we were munching on the compost cookies I had baked.

I’ve made a couple of minor tweaks. The first batch I tried at the suggested temperature of 375°F came out more flat and crispy than I would like — Wally didn’t mind, but I can admittedly be a bit neurotic about these things. I don’t know if our oven is simply too hot, but I reduced the temperature to 350°F, and the baking time from 18 minutes to 12, with better results. 

The dough has so many bits and chunks in it — it’s seriously bonkers how many different things are in these cookies! For the best results, I recommend scooping out your dough with a 1½-inch-diameter cookie scoop and placing the balls in a resealable container in the freezer overnight. But if you can’t wait that long, a couple of hours will suffice. –Duke

Compost cookies are a fun take on chocolate chip cookies that pack in your favorite snacks.

Compost cookies are a fun take on chocolate chip cookies that pack in your favorite snacks.

Servings: 24 cookies

Active Time: 30 minutes 

Total Time: 2 hours, plus an optional overnight chill

Potato chips, toffee, chocolate, pretzels — throw in whatever you’ve got left in the pantry!

Potato chips, toffee, chocolate, pretzels — throw in whatever you’ve got left in the pantry!

INGREDIENTS

  • 16 tablespoons unsalted butter, room temperature 

  • 1 cup granulated sugar

  • ⅔ cup light brown sugar, tightly packed 

  • 1 tablespoon light corn syrup

  • 1 egg

  • ½ teaspoon vanilla extract

  • 1⅓ cups flour

  • ½ teaspoon baking powder

  • ¼ teaspoon baking soda

  • 1 teaspoon kosher salt

  • ¾ cup chocolate chunks 

  • ½ cup Heath toffee bits 

  • ⅓ cup old-fashioned rolled oats

  • 2½ teaspoons ground coffee

  • 2 cups potato chips

  • 1 cup mini pretzels 

The first step is mix up the ingredients that could be used for a graham cracker crust — though here they’ll just create the base for the cookie dough.

The first step is mix up the ingredients that could be used for a graham cracker crust — though here they’ll just create the base for the cookie dough.

GRAHAM CRACKER “CRUST”

  • 1½ cups graham cracker crumbs

  • ¼ cup milk powder

  • 2 tablespoons sugar

  • ¾ teaspoon kosher salt 

  • 4 tablespoons unsalted butter, room temperature 

  • ¼ cup heavy cream

The graham cracker “crust”

The graham cracker “crust”

PREPARATION

Start with what Tosi calls a graham crust. I’m looking forward to trying this on the next Key lime pie I make, but here it’s used as a textural component in the cookies. Toss the graham cracker crumbs, milk powder, sugar and salt with your hands in a medium bowl to evenly distribute your dry ingredients.

Add the butter to the dry ingredients and toss again to evenly distribute. Then add the heavy cream. The butter and cream will act as a glue, adhering to the dry ingredients and turning the mixture into small pea-sized clusters. The crust should hold its shape if squeezed tightly in the palm of your hand. If it isn’t moist enough, mix in an additional 1 to 1½ tablespoons of butter.

Next, move onto the cookie dough. Combine the butter, sugars and corn syrup in the bowl of a stand mixer fitted with the paddle attachment. I swear by my KitchenAid stand mixer, but an old-school hand mixer will work, too. Cream together the ingredients on medium-high for 2 to 3 minutes. Using a spatula, scrape down the sides of the bowl, add the egg and vanilla, and beat for 7 to 8 minutes more. 

Reduce the speed to low and add the flour, baking powder, baking soda and salt. I usually add this in batches to prevent the flour from flying out of the bowl. Mix until the dough comes together, no longer than 1 minute. (Do not walk away from the appliance during this step, or you will risk over-mixing the dough.) Scrape down the sides of the bowl with a spatula.

Still on low speed, add the chocolate chunks, toffee bits, graham cracker crust, oats and coffee, and mix until just incorporated, about 30 seconds. Add the potato chips and pretzels, still on low speed, until just incorporated. When you’re adding the potato chips and mini pretzels, it’s best not to mix them too much; you want to retain irregular bits and pieces. That way you can taste the salty-sweetness of the cookie.

Duke recommends freezing the dough for better results — if you can stand the wait!

Duke recommends freezing the dough for better results — if you can stand the wait!

Using a 1½-inch-diameter cookie scoop, portion out the dough equally. I make a dome shape that’s flat on the bottom. Don’t bake your cookies at room temperature — they will end up flat like a pancake. Mine still came out pretty flat, but the longer I froze the dough, the more shape they kept. Place inside a resealable container and refrigerate for at least 2 hours, or freeze overnight. 

A cookie scoop helps shape the dough.

A cookie scoop helps shape the dough.

Preheat the oven to 350°F.

Arrange pre-scooped cookie dough a minimum of 4 inches apart on parchment or silpat-lined sheet pans.

Bake for 12 minutes. The cookies will puff, crackle and spread. After 12 minutes, they should be golden-brown. Give them an extra minute or so if that’s not the case.

Cool the cookies completely on the sheet pans before transferring to a plate or an airtight container for storage. Wally learned this the hard way — he wanted to have these right out of the oven, but the cookies didn’t have enough time to solidify. At room temp, cookies will keep fresh for five days; in the freezer, they will keep for one month.

Call ’em what you will — compost, garbage, kitchen sink — but these Milk Bar-inspired cookies are delicious by any name.

Call ’em what you will — compost, garbage, kitchen sink — but these Milk Bar-inspired cookies are delicious by any name.

Turkish Coffee Buns

Try Caleb’s twist — see what we did there? — on glazed cinnamon cardamom buns, where he activates the yeast in coffee instead of milk. (Believe it or not, it works!)

These delectable treats look almost too good to eat!

These delectable treats look almost too good to eat!

I recently had some amazing Turkish coffee buns at Lula Cafe in Chicago’s Logan Square neighborhood, and ever since I had been wondering if I could activate yeast in coffee instead of water or milk. So I tried it!

I made my own version of the buns and I’m quite proud of the bake. –Caleb

Servings: 8

Active Time:  1 hour, 10 minutes

Total Time: 5 hours, 20 minutes, plus an overnight proof

Brew up some coffee…

Brew up some coffee…

…cuz you’ll be activating the yeast in it!

…cuz you’ll be activating the yeast in it!

INGREDIENTS

Dough

    • 1 cup freshly brewed coffee

    • 1 teaspoon honey

    • 1 tablespoon active dry yeast

    • 1 egg

    • 1 egg yolk

    • 3½ cups bread flour (all-purpose is fine, too)

    • ½ cup granulated sugar

    • 1½ teaspoon ground cardamom (from about 3 teaspoons of pods)

    • 1 teaspoon fine kosher salt

    • 6 tablespoons room-temperature unsalted butter, plus more for bowl

You’ve got to prove the dough overnight — and this is a step you can’t skip!

You’ve got to proof the dough overnight — and this is a step you can’t skip!

Roll out the dough before the twists and turns take place.

Roll out the dough before the twists and turns take place.

Filling and Assembly

    • 6 tablespoons room-temperature unsalted butter 

    • 2 tablespoons instant coffee or espresso powder

    • 1 tablespoon ground cinnamon

    • 1½ cups (packed) brown sugar, divided

    • all-purpose flour (for surface)

PREPARATION

Dough

Brew fresh coffee, and allow it to cool until lukewarm, ideally 110ºF-115ºF—any hotter and you’ll kill the yeast.

Pour the coffee into the large bowl of a stand mixer. Whisk in the honey and yeast, and let it sit for 10-15 minutes until there’s a layer of foam on the surface. This means the yeast is active.

Add the egg, egg yolk, flour, granulated sugar, cardamom and salt to the yeast mixture and mix with the dough hook on low speed until well combined. 

Increase the speed to medium and continue to mix until the dough is smooth and elastic, about 10 minutes. 

Gradually add butter, 1 tablespoon at a time. When you’ve added 6 tablespoons, mix until the dough is smooth, supple and shiny for 10-15 minutes to develop the gluten.

Transfer the dough to a large buttered bowl, cover with plastic wrap and a kitchen towel, and let it sit at room temperature until doubled in size, 1-1 ½ hours. 

Punch the dough down, cover the bowl tightly in plastic wrap and chill overnight. This is an important step: Don’t skip it. The slow proof creates more flavor because it gives the yeast more time to process the sugar.

Knotty, knotty: You might need to watch a tutorial on how to get your buns looking so good.

Knotty, knotty: You might need to watch a tutorial on how to get your buns looking so good.

Filling and Assembly

Mix the butter, cinnamon and 1/2 cup brown sugar in a medium bowl until combined.

Work quickly and keep the dough as chilled as possible to make rolling more manageable. Turn out the dough onto a lightly floured piece of parchment paper and roll to a ¼-inch-thick rectangle, about 16 inches by 12 inches. Cover with plastic and chill until the dough is firm, 30-60 minutes.

Spread the butter mixture over two-thirds of the dough. Fold the plain side over the middle, then fold the opposite third over (like folding an envelope). Roll to a 12-inch-by-8-inch rectangle about ½-inch thick. Slice lengthwise into eight 1-inch-thick strips.

Working one at a time, lay each strip on a clean work surface with the long side facing you. Using your palms, gently twist each end in opposite directions until the entire strip is spiraled. Hold one end of the strip between your thumb and index finger. Working away from you, tightly wrap the strip around three fingers. Wrap it around your fingers again, placing the second loop closer to the palm of your hand. As you bring the strip across the back of your hand, cross over the first loop, angling toward the end of your index finger. Cross the dough over the front of your hand and tuck the end into the center while removing your fingers and pushing through to the other side to create a knot. 

If all of that seems a bit much, Epicurious has kindly offered up step shots. Whatever shape you make, just be sure the knots are tight.

Divide the twists between two rimmed baking sheets, spacing them evenly apart. Cover loosely with plastic wrap and let them sit at room temperature until they’ve doubled in size, 45-60 minutes.

Place the racks in the upper and lower thirds of the oven.

Preheat to 325°F. 

Bake the coffee buns, rotating pans from top to bottom and front to back halfway through, until they’re deeply golden brown, 25-30 minutes.

Bring the remaining 1 cup brown sugar and ½ cup water to a boil in a small saucepan. Generously brush the syrup over the hot buns. FYI: The glaze recipe makes enough for two or three rounds of brushing. Beware — brushing this many times will make for a sweet and sticky bun. Which, don't get me wrong, is delicious. But if you want less sweet, cut the recipe in half and brush the buns once. 

Syrupy sweetness! Don’t be shy with that glaze.

Syrupy sweetness! Don’t be shy with that glaze.

This take on Turkish coffee buns is one you won’t soon forget.

This take on Turkish coffee buns is one you won’t soon forget.

Note: If you want to make regular cinnamon buns with this recipe, consider the following swaps: 

  • Activate the yeast in whole milk instead of coffee.

  • Use 1 tablespoon of Chinese five-spice powder and 2 tablespoons of cinnamon (skipping the instant coffee or espresso powder).

Dig in!

Dig in!

Mulligatawny Soup: Where It Originated and How to Make It

One of the more flavorful (and seemingly bizarre) soup recipes, this Indian dish has many variations. Here’s our favorite.

British colonists in India insisted on a soup course — and mulligatawny was born

British colonists in India insisted on a soup course — and mulligatawny was born

The British historically aren’t known for their culinary skills. Sure, they can whip up a myriad of delicious cakes, as The Great British Baking Show has taught us. But when it comes to meals, many Brits are as bland as can be. My Welsh grandmother once told me, “The only spices you need are salt and pepper.” I disagreed, and with the rise of curry shops around England, the British eventually came around as well. It’s strange to me that a country that colonized so many parts of the world took so long to add bold flavors to its cuisine.

When you try mulligatawny soup, there’s no denying it’s an unexpected but delicious blending of British and Indian culinary styles.


The Origins of Mulligatawny Soup

Indian meals are traditionally served all at once, the containers placed in the center of the table, family-style, with everyone digging in and helping themselves to the shared dishes.

During the British Raj, between 1858 and 1947, when the sun never set on the British Empire, the fussy British colonists and soldiers refused to alter their way of dining, which I’m sure they felt was much more civilized. And that included a soup course.

Well, there wasn’t really an Indian soup, per se, so the servants would water down one of their occupiers’ favorite dishes, milagu tannir, which translates to “pepper water” in Tamil, a southern Indian dialect. (One source says the dish was molegoo tunes, a broth drunk by poor Sri Lankans.) The British never seemed to worry about pronouncing things incorrectly, and they garbled the dish until it came out mulligatawny, as it’s known today.

The colonists brought mulligatawny back to Britain, where it’s a staple on pub menus, though the recipe varies widely. We’re partial to the version my mom makes.


Ingredients

  • 2-3 stalks celery, thinly sliced

  • 2 chicken breasts, cooked, cooled and shredded

  • 5 garlic cloves, minced

  • 3 tablespoons garam masala

  • 2 teaspoons curry powder

  • 8 cups chicken broth

  • 2 bay leaves

  • 1 teaspoon ground ginger

  • 2 tablespoons olive oil

  • 2 tablespoons unsalted butter

  • 2½ cups onion, chopped

  • 3 large Granny Smith apples, diced

  • 1 small can diced green chilies

  • 2 cups carrots, chopped

  • 3 tablespoons lemon juice

  • 1 14-ounce can diced tomatoes

  • Salt and pepper to taste

  • 1 cup heavy cream
     

Apples, curry, carrots, garam masala, chicken, green chilies and onions all come together in a surprisingly cohesive and delicious meal

Apples, curry, carrots, garam masala, chicken, green chilies and onions all come together in a surprisingly cohesive and delicious meal

Preparation

Put oil and butter in a skillet until it melts.

Sauté onion for 4-5 minutes.

Add garlic, sautéing for 2 minutes.

Add the rest of the ingredients to a large pot, except the heavy cream. Cover and simmer.

Ladle out some of the warm liquid and slowly add the heavy cream while stirring. This will help prevent the cream from curdling. Add it back to the pot and cover.

Simmer for at least an hour. The longer the better.

Serve with fresh parsley (and a dollop of sour cream if you’d like).


Back in the day, the heavy cream was coconut milk, so feel free to substitute that.

The original recipe also called for a potato (peeled and chopped), but the Shirl swaps this out for another apple. You can’t tell the difference, she says, and she likes the added sweetness. –Wally

Chana Masala Recipe

Also known as chole, this Indian recipe will satisfy your craving for curry.

The delicious chana masala we had at a roadside restaurant while visiting the Ajanta Caves in India inspired us to hunt down a similar recipe

The delicious chana masala we had at a roadside restaurant while visiting the Ajanta Caves in India inspired us to hunt down a similar recipe

Wally and I can’t get enough of spicy food. Our favorite cuisines employ heat as part of their flavor profile, and neither of us can resist a good curry or salsa with a bit of a lingering heat. In fact, when we cook from a recipe, we always double the spice.

As temperatures drop, I find my mind wandering off to the memory of Wally and I eating the most delicious chana masala at a dhaba, a roadside restaurant, on our return from the Ajanta Caves in Maharashtra, India.  

The nourishing, flavorful stew, made with chickpeas and diced tomatoes, is a simple, adaptable dish. It's begun like most curries, with garlic, ginger and onion, simmered in an aromatic mixture of traditional Indian spices like cumin, garam masala, coriander and turmeric.

An ingredient worth adding to your pantry, and what gives channa masala its sour citrus note is amchoor powder, a tart and earthy spice made from dried unripe green mangoes. You can order amchoor powder here, or substitute with a squeeze of lemon juice.

Top the chana masala with a dollop of cooling yogurt and serve with naan or basmati rice. Ours gets heat from serrano chiles, but if you’d prefer something less spicy, simply omit one of the peppers.


Yield: 6 to 8 servings
Active Time: 1½ to 2 hours
Total Time: 8 to 12 hours for soaking the garbanzo beans
 

Chickpeas and aromatic spices are at the heart of this chana masala recipe

Chickpeas and aromatic spices are at the heart of this chana masala recipe

Minced peppers, onions and ginger add to the flavor profile

Minced peppers, onions and ginger add to the flavor profile

Ingredients

  • 16 ounces garbanzo beans (chickpeas)
  • salt
  • ⅓ cup peanut oil
  • 1 tablespoon ground cumin
  • 1 large yellow onion, chopped
  • 1½ teaspoons ground turmeric
  • 2 fresh serrano peppers, minced
  • 8 garlic cloves, minced
  • 1 3-inch piece of ginger, peeled and roughly chopped
  • 14.5 ounces diced tomatoes, juices reserved
  • 2 tablespoons ground chana masala spice blend
  • 1 tablespoon ground garam masala
  • 1 tablespoon ground cumin
  • ½ teaspoon cinnamon
  • 2 teaspoons sugar
  • juice of 1 lemon
  • ¾ teaspoon amchoor (dried mango) powder
  • cooked basmati rice for serving (optional)
  • chopped cilantro for garnish (optional)
     
We like to rehydrate garbanzo beans, but if you have less time, canned chickpeas will work as well

We like to rehydrate garbanzo beans, but if you have less time, canned chickpeas will work as well

Preparation

Put the chickpeas in a large pot and add enough water to cover them by 3 to 4 inches. Soak the beans 8 hours or overnight.

Drain the chickpeas in a colander and rinse well under cold water. Add them to a large pot, cover the beans with several inches of water and bring to a boil.

Reduce the heat to medium-high and cook until the chickpeas are tender, 1 to 1½ hours. When the chickpeas are mostly tender, add a few large pinches of salt to the pot. Drain well, rinse with cold water to stop cooking and transfer to a bowl.

Purée the ginger and garlic in a food processor until it forms a paste.
Heat oil in a large pot over medium-high heat. When it’s hot, add the onions and season with salt, stirring occasionally, until they begin to soften, 3 to 5 minutes.

Add the turmeric and diced serrano peppers and continue cooking until the onions are caramelized, about 5 to 7 minutes.

Add the garlic and ginger paste, stirring occasionally, for another 2 minutes.

Add the chickpeas, tomatoes, chana masala spice mixture, garam masala, cumin and sugar. Cover and simmer over medium heat until the chickpeas are tender and the mixture has thickened slightly, about 30 minutes. Stir in the amchoor powder and lemon juice.

Serve hot, over basmati rice or with naan, and garnish with cilantro, if desired. –Duke

Thai Iced Tea

This recipe for Thai tea is perfect for hot days and sweet tooths.

Thai iced tea: where dessert and drink come together into one delicious treat

In Thailand, iced tea isn’t served unsweetened with a lemon wedge. Known as cha yen, it’s more of a caffeinated dessert: a mixture of black tea, sweetened condensed milk and ice. I’m a fan. I mean how can you not have Thai iced tea when in Thailand? I enjoy it so much, I hunted down the recipe so I could have it even when I’m not in Thailand!

The exact origins of Thai tea remain a mystery, but some historians believe it to be a lingering influence from Field Marshal Plaek Phibunsongkhram,  a former prime minister of Thailand with a penchant for Western culture. The tea became a staple of Thai street food culture, sometimes spiced with star anise and orange blossom water, but more often than not, served without any additional flavorings.

As the climate in Thailand tends to be hot and humid, tea is often drunk cold with ice. Sweetened condensed milk was most likely introduced during the Colonial era and grew in popularity since it keeps without refrigeration.

Many Thai restaurants in the U.S. use an instant mix that contains the artificial food coloring FD&C Yellow No. 6 in the mix, also known as sunset yellow. It’s derived from crude oil, which gives it that bright orange hue, and incidentally, it’s the same dye that gives Kraft Mac & Cheese its trademark color. No thank you.

This version has a distinctively floral and spicy flavor, sweetened by a blend of condensed and evaporated milk. The sum of the parts isn’t overly sweet but quite rich, ideal in small doses. It’s one of those recipes that’s surprisingly easy to make, and once you get the basics down, you can adjust the flavors and concentration the way you like. The tea base and spiced syrup can be kept refrigerated for up to a week.

Cheers, or chai yo, as they say in Thailand! –Duke


Special Equipment

  • Saucepan
  • Measuring spoons
  • Small bowl
  • Glasses
     

Yield: 8 servings

Active Time: 10 minutes

Total Time: Chill for 8 hours to overnight

Break out the condensed milk, star anise, cardamom seeds, cloves and ceylon tea for this recipe

Ingredients

  • 8 cups water
  • 10 bags black tea (preferably ceylon)
  • 4 star anise pods
  • 1 teaspoon decorticated cardamom seeds
  • 4 whole cloves
  • 3 tablespoons sugar
  • ¼ cup sweetened condensed milk
  • ¼ cup half & half
  • ⅛ teaspoon vanilla extract
  • Ice

Steep and chill the tea for 8 hours. Good things come to those who wait

Two kinds of milk mix together to give this tea its creamy, sweet taste

Preparation

Bring sugar and 1 cup of water and to a boil. Simmer for 10 minutes in a small saucepan, stirring to dissolve the sugar.

Remove the pan from heat and add star anise, cardamom seeds and cloves. Let sit for 20 minutes until flavors are infused.

Strain mixture through a fine mesh sieve into a small bowl. Put in fridge.

Add 10 black tea bags and 7 cups cold water to a large pitcher.

Chill for 8 hours to overnight.

Discard tea bags.

Pour chilled syrup into pitcher.

In a small bowl, whisk together sweetened condensed milk and half & half. Add ⅛ teaspoon vanilla extract. Add to the tea in pitcher.

Serve over ice.

Rosa Bonheur, a Friendly Watering Hole in Parc des Buttes Chaumont

One of our favorite bars in Paris, France goes from family-friendly to gay dance party in the course of a day. Plus: the recipe for its signature cocktail!

The charming Rosa Bonheur bar at Buttes Chaumont in Paris, France

The charming Rosa Bonheur bar at Buttes Chaumont in Paris, France

After exploring the hilly parkscape of Buttes Chaumont, our friend and Parisian resident Kent, Wally and I arrived at the “Log Cabin,” which is the congenial and charming wood-beamed pavilion Rosa Bonheur.

The artist Rosa Bonheur has a delightful bar named for her in Parc des Buttes Chaumont in Paris

The artist Rosa Bonheur has a delightful bar named for her in Parc des Buttes Chaumont in Paris

The bar was named after Rosa Bonheur, a successful 19th century animalière (painter of animals) known for her artistic realism. Beatrix Potter she was not: Bonheur was a nonconformist and a celebrated feminist who earned a living as an artist, managed her own property, wore trousers, hunted and smoked.

Bonheur painted lifelike depictions of animals

Bonheur painted lifelike depictions of animals

Lions and horses were among Bonheur’s favorite subjects

Lions and horses were among Bonheur’s favorite subjects

Insider’s Tip: If you want to visit Rosa Bonheur, arrive before 4 p.m., as a fence is put up then and you will have to wait in line to enter.
Later in her life, Bonheur took to wearing trousers and became a feminist icon

Later in her life, Bonheur took to wearing trousers and became a feminist icon

Bonheur bought an estate near the Forest of Fontainebleau and settled there with her lifelong companion, Nathalie Micas (and, after Micas’ death, American painter Anna Klumpke), and her menagerie of animals. She died in 1899 at the age of 77.


We grab a bite to eat at Rosa Bonheur — before it turns into a gay dance club

We grab a bite to eat at Rosa Bonheur — before it turns into a gay dance club

The bar is mellow and family-friendly on weekend days

The bar is mellow and family-friendly on weekend days

Cabin Fever

The laidback crowd features a mix of Parisian fashionistas and hip families earlier in the day, giving over predominantly to gay men as evening approaches.

Inside is a full bar and a food counter serving Mediterranean-style tapas. “Round Here” by the Counting Crows played. A little girl plopped herself down at the long table where we sat and began coloring in her book.

After an hour or so, as the afternoon wore into evening, the communal tables were pushed back, families disappeared, and it became a buzzing dance hall. The dance mix began with Miley Cyrus’ “We Can’t Stop,” followed by Brandy and Monica’s “The Boy Is Mine.”

Later in the evening, I observed a couple of flannel-clad and unshaven “lumber gays,” one of whom was animalistically lapping the side of the other’s face.

The whimsical bar at Rosa Bonheur, where you can order tapas and the signature cocktail

The whimsical bar at Rosa Bonheur, where you can order tapas and the signature cocktail

Our drunken friend Michael sized up the crowd with one of his hilarious comments: “There’s a fat man, a gay man and another fat man, who’s probably gay. They all do blow in the bathroom and throw up.”

Wally and Duke in Buttes Chaumont, down the hill from Rosa Bonheur

Wally and Duke in Buttes Chaumont, down the hill from Rosa Bonheur

Insider’s Tip: If you want to visit Rosa Bonheur, arrive before 4 p.m., as a fence is put up then and you will have to wait in line to enter.

One of the signature cocktails we enjoyed was a refreshing elixir made with Lillet Blanc, grapefruit juice and ginger beer called the Rosa Summer. You can also order a chilled bottle of the Rosa Bonheur Rosé, so you don’t have to go back to to the bar as often.

We’ve recreated an ode to this at home, and you can easily make a pitcher of this to serve at your next soirée.

The Rosa Summer, the perfect summer cocktail

The Rosa Summer, the perfect summer cocktail

Rosa Summer

Ingredients

  • ¾ ounce Lillet Blanc
  • ½ ounce grapefruit juice
  • ½ ounce ginger beer


Preparation

Fill a cocktail shaker with ice. Add all ingredients except for the ginger beer. Shake vigorously for about 10 seconds.

Strain into a cocktail glass and top with a splash of ginger beer.

Garnish with a sprig of mint.

Enough Rosa Summers and you’ll be jumping for joy like Wally and Kent

Enough Rosa Summers and you’ll be jumping for joy like Wally and Kent

Kirsten and Jennifer sit on a bench with interesting graffiti outside the bar

Kirsten and Jennifer sit on a bench with interesting graffiti outside the bar


Rosa Bonheur
2 Allèe de la Cascade
Paris, France

Coconut Macaroons Recipe

A cookie recipe that’s sure to brighten your day.

Delectable toasted coconut macaroons, like the ones we had after our hamman in Fès, Morocco

Springtime weather in Chicago can be wildly unpredictable at best. Sure, you made it through winter, but March often throws a combination of wind, rain and, more than occasionally, snow our way. Days can vary from sunny and warm to cold and rainy up until the end of May, before summer officially arrives.

Recently, on one of these blustery and chilly early spring days, I was humming “Holiday” by Madonna and daydreaming about a faraway rooftop bar with vibrant pink bougainvillea in bloom and the delicious, bite-size, toasty, golden coconut macaroons with soft chewy centers we were served at Palais Amani in Fès, Morocco.

This simple recipe, adapted from Ina Garten, is bound to make your day better. It always reminds me of the ones we enjoyed on a warm and sunny afternoon on our spa day in the historic medina. A perfect combination of toasted coconut, meringue-fluffy egg whites and sweetened condensed milk yield a dense and slightly tangy interior.

These confections are not to be confused with macarons, the meringue-based French cookie filled with buttercream, ganache or fruit curd.


Makes: 24 to 30 cookies

Active Time: 10 minutes

Total Time: 40 minutes

It doesn’t take much to whip up a batch of these little balls of sunshine

It doesn’t take much to whip up a batch of these little balls of sunshine

Ingredients

  • 14 ounces sweetened flaked coconut
  • 14 ounces sweetened condensed milk
  • 1 teaspoon pure vanilla extract
  • 2 extra-large egg whites at room temperature
  • ¼ teaspoon kosher salt


Preparation

Preheat the oven to 325 degrees.

Combine the coconut, condensed milk and vanilla in a large bowl.

Whip the egg whites and salt on high speed in the bowl of an electric mixer fitted with the whisk attachment until they make medium-firm peaks.

Carefully fold the egg whites into the coconut mixture.

Drop the batter onto sheet pans lined with parchment paper using either a 1¾-inch-diameter ice cream scoop or 2 teaspoons.

Bake for 25 to 30 minutes, until golden brown.


Go ahead — you deserve a little to time to relax, and if you fancy a cup of tea, might I suggest chamomile? –Duke